last update: 2008-01-30
editor: use it
That said, you might understand, why the workflows are sometimes somewhat strange, the usability could be way better und you are going to have some trouble getting some things done. Sorry.
TOC
- basics
- Play the game
- Libraries
- General workflow
- common dialogs
- GAPI image creator
- Rich Text Creator
- Split Image Creator
- tab1: Tiles / GraphicObjects / DecoLivings
- TileTypes
- GraphicObjects
- DecoLivings
- tab2: Charakters
- basic stats
- visuals
- actions
- ai-hints
- tab3: Actions
- general values
- graphics effex
- attack
- healing
- temporary effects
- tab4: MapEvents / HeroAbilities
- MapEvents
- HeroAbilities
- tab5: Map
- Peripheral stuff
- rules
- The MapCreator: General
- The MapCreator: Painting the world
- The MapCreator: Populate it
- The MapCreator: Assign objectives
- Give rewards
- test it!
basics
Play the game
There is no chance to understand the editor, if you don't know the game. So play first some other campaign, understand the connections and then fire up the editor. If you don't understand some editor-widgets, it may be very helpful to just play around with it and see the result in the game.
Libraries
Libraries contain a collection stuff you have created with the editor, such as tiles, actions or maps - so basically anything you do in the editor is stored in here. Library-files also contain references to image-files. This is important: It's only full-path references. This means, that the library-file stores images as "C:\poroba_editor\default_library\your_face.jpg". This causes some considerations: In theory, you can store your image-files wherever you want - but, by doing that you can't share your library with anybody else, since they would need to recreate exactly your file-positions. So here is my recommendation: Follow this generic directory-scheme:
C:\poroba_editor\[library_name]\[files]
In this way, anybody uses the same structure and library-files can be shared. Everybody wins. It may be tiresome, but make sure that all files are there! All material and libraries you get here will follow this scheme.
General workflow
The editor is dominated by four elements:
- a listbox containing all already created instances of class (e.g., all tiles or all maps)
- lots and lots of widgets to alter parameters of an instance (e.g. the trespass-cost of a tile-type)
- a blue "modify [...]"-button that stores all changes made with the widgets into the currently selected item in the corresponding listbox
- a blue "add as new [...]"-button" that stores all changes into a new instance. CAUTION: In some cases it is possible to store more than one instance with the same name. This may cause confusion later!
So, what you do is to create instances. Therefore you select one of the tabs (as "Map" or "Actions") play around with the controls and store the changes afterwards either as new instance or by modification of the old one. Not until you hit one of the blue buttons do any of the changes you made count! Then you create the next intance - possibly one that already incorporates the instance you created before (e.g., you create a TileType first and then us it in a map). The order of the tabs resembles roughly the order in which you create the instances. However, you will switch a lot between these tabs, so this is just a suggestion.
Save often
You changed something? Store the now altered library to the disk! Mistakes happen often and the program isn't too stable :/ Just use your gaming instincts.
common dialogs
You will encounter the following dialogs quite often - so a good explanation of them can't hurt:
GAPI image creator
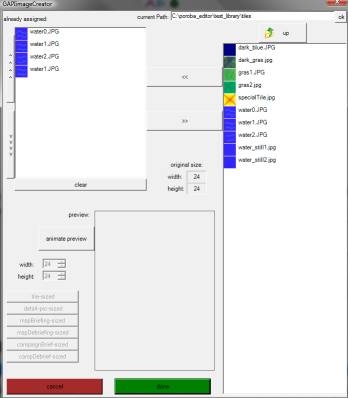
With this, you give the game its face ;) Select an image in the selection-list on the right. When you've found it, double-click it to add it to the animation. When you want to create a static image (perhaps for character faces) you are done already; press [return] to accept it and close the dialog. If you want to create an animation just doubleclick on another image! On the left, you see all images in the animation. If you mistakenly one image, just doubleclick it in the left list and it's removed from the animation. By hitting "animate preview", you can see, how the animation will look later.
RichText creator
... coming soon ...
SplitImage creator
... coming soon ...
Tiles / GraphicObjects / DecoLivings
In this tab you roughly create the background and the visuals of a map
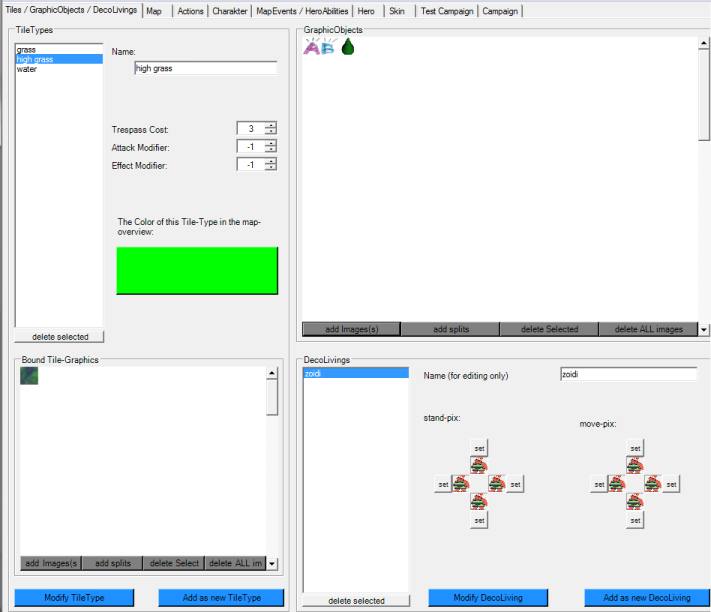
TileTypes
TileTypes define how a tile affects character-movements and actions:
Trespass Cost controls, how many AP a character loses when he walks over the tile
Attack Modifier influence the probability with which a action hits. If a character stands on a field with a high AttackModifier, he is more likely to land a hit and less likely to suffer from a blow.
Effect Modifier influences the damage done. A high value gives the character, who stands there, a stronger attack - or a stronger armor when defending.
Below that, you can set the color of the TileType in the mini-map. Sensible colors are encouraged.
A TileType can look in different ways. To give it a texture, hit "add Image(s)" on the bottom of the left side. There is an explanation of how to use the "GAPIiamgeCreator" above on this page. "Add splits" lets you create several tiles out of one image. More details should be somewhere above on this page. You can guess yourself, what "delect Select" and "delete ALL" do. And that's it for TileTypes. Do not forget to hit one of the BlueButtons to apply your changes!
GraphicObjects
This area lets you create obstacles on the map, like trees or walls or ... suicide-booths. Just use the buttons "add Image(s)" to "delete images" to create GraphicObjects. I explained before on this page how to use the dialogs "GAPIimageCreator" and "SplitImageCreator". Please go there for more information
DecoLivings
DecoLivings are meant to add some live to the maps. They don't actually do anything besides roaming around. You create them by assigning animations to them - one for each direction and standing/moving - and storing them with one of the blue buttons.
Charakter
In this tab you create all charakters: Your companions, enemies, monsters, what you want.
basic stats
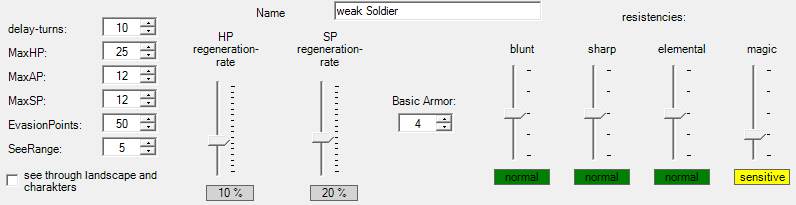
These controls and values define the strength and possibilities of the charakter. Playing around with them makes most of the balancing!
- name: We start easy ;) This name may get suffixes through promoting.
- delay turns: Defines, how often the charakter is allowed to act: There is a global clock ticking and everytime the worldticks divides without rest by this value, this charakter is allowed to move. So, if charakter A has a delay of 5 and B a delay of 10, B will move double as often as A. Values below 1 are forbidden.
- MaxHP: The maximum amount of health points.
- MaxAP: The maximum amount of action points. These points are refreshed every turn and may be spent for movement and actions.
- MaxSP: The maximum amount of special points. These are needed to execute some (usually elaborate) actions.
- evasion points: Defines, how good the charakter evades attacks. This value is weighed against the attack points of an action to decide, if the attack hits or not. NOTE: There may be strong influences from the tiles, the opponents stand on!
- see range: How far the charakter is able to see.
- see through landscape and charakters: If checked, the charakter can see through everything, walls, trees, people. This can be very valuable - at least on maps with "fog of war".
- HP regeneration-rate: Defines, how well the charakter is able to regenerate hp. Therefore, the charakter needs to save some ap in a turn: The percentage of saved aps decides the amount of healed hp.
Examples: The charakter has a hp-reg-rate of 10% and saves 100% of his ap during a turn, then he will regenerate 10% of his maxHP. Assumin a hpRegRate of 50% and 50% saved aps the charakter will heal 25% of his maxHP. Negative values are fun: If you don't spend your aps you get damaged ;) - SP regeneration-rate: Same as hp regeneration above, just with sp.
- Basic Armor: This value is subtracted from any damage done by an attack. Let's say the charakter was attacked with an action that causes 7 damage points. The charakter has 5 basic armor points, so the attack causes a loss of 2 hp.
NOTE: This is only true, when the opponents stand on the same type of tile. Otherwise, the tiles' modificators may alter the result! - resistencies: These values are modificators of the vulnerability against certain kinds of attacks: "no defence" means 0 armor points and doubled damage. "sensitive" halves the basic armor points and multplies the caused damage by 1.5. "normal" causes no influence on the damage computation. "strong": armor increased by 50% and damage decreased to half. "immune": No damage possible. It's easy to generate some kind of "Rock, Paper, Scissors"-principle with these controls!
visuals
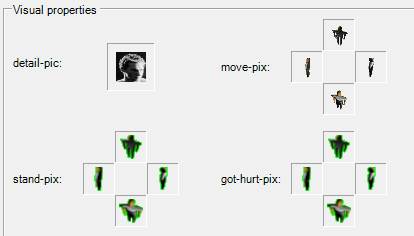
Define here, how your charakter should look. The "detail-pic" is the image displayed in menus, the other images define the looks on the map. To set pictures just klick in the fitting frame. Now define the picture or animation in the up-popping "GAPI image creator" (see above!). "Got-hurt-pix" are siplayed, when a charakter was damaged.
actions
Your charakter can move and pose now, but not fight or heal or whatever he's supposed to do. Therefore you have to give him two actions. To do that, select an action (of course, you need to create actions first in the "Actions"-tab) in the list box on the right (and check the action's stats in the box below). If you've found the right action press one of the two "c----" buttons to assign the action to the charakter. That's all. Don't forget to press a BlueButton!
ai-hints
Not implemented yet. But you can expect this to change soon!
Actions
Define, what charakters can do on the map in here.General values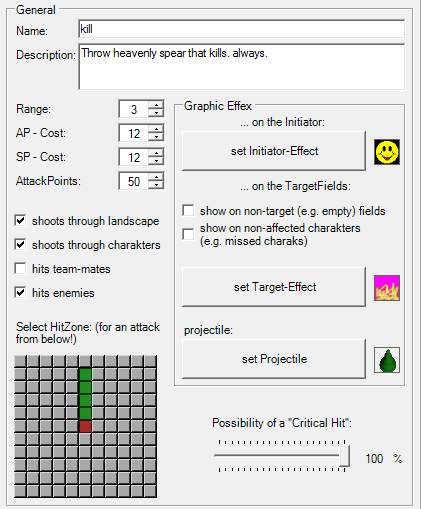
Define anything regarding the action, but the actual effect, with these values:
- name: Well ... uhhm ... just guess.
- description: This short text is supposed to charakterize the action shortly. It is shown whenever details to an action are displayed in the game
- Range: The range of the attack. 0: the charakter can just use this attack on himself. 1: Just directly neighbouring tiles, ...
- AP-Cost: The charakter needs to have at least this many ap to initiate the action.
- SP-Cost: The charakter needs to have at least this many sp to initiate the action.
- AttackPoints: Determines the likelihood of a hit. The program weighes the action-points against the target's evasion-points to decide (and takes also modificators through tile-types into account!).
- shoots through landscape / charakters, hits team-mates / enemies: Should be self-explanatory.
- HitZone: Click on gray fields to activate them. The central (red) rectangle represents the actually attacked tile (from south). Green fields mark tiles, that are supposed to be also hitten, gray fields get not attacked.
- Possibility of critical hit: Determines, how likely a critical hit is when a target is hit. Critical hits bypass the armor and cause more damage. The actual effect of a critical hit can be adjusted individually for each map. Do that on the "map"-tab of the editor!
Graphic Effex
Set the way, the action is displayed with these controls. You can click on the frames beside the buttons to see a preview of the effect. To assign any effects, just press on the according buttons and create the desired animation in the up-popping GAPI image creator (see above on how to use that dialog). The "projectile"-effect will be rotated to face in the attack-direction. Specify the effect as if shooting straight north!
Attack
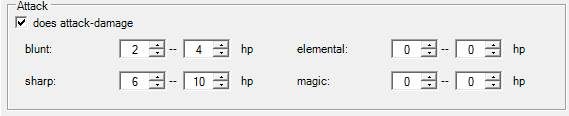
Define orinary attacks with these controls. Actually, you just have to enter values for the min- and max-damage the action is supposed to cause for every type of damage. In the picture above, the action would cause 6 to 10 points "sharp"-damage and a little "blunt"-damage, but no "elemental" or "magic"-damage.
Make sure, that the "does attack-damage"-box is checked! Otherwise, the action won't cause any damage!
And as always: Don't forget to press a BlueButton ;)
Healing
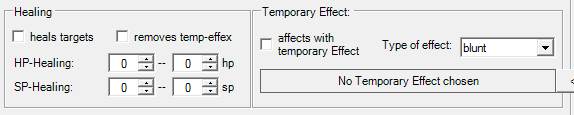
Use the controls in this frame to make the action heal the targets. Similar to the attack-frame you specify min- and max-healings for both, hp and sp. If the "removes temp-effex"-checkbox is checked, any target of the action is freed from all temporary effex, but map-temp-effex(they are not removable!).
Again, make sure, that the "heals targets"-checkbox is checked - otherwise any other entry in the frame will have no effect and the action won't heal!
Even, if you can't hear it anymore: Don't forget to press a BlueButton, when you're content with your achievements ;)
Temporary Effects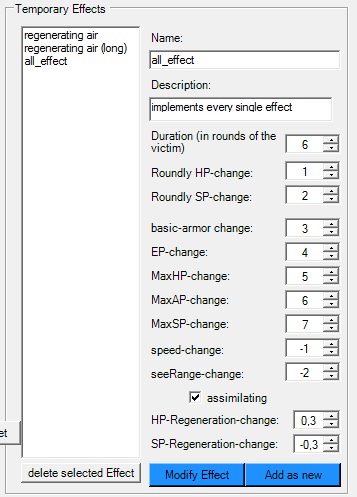
Temporary effects stick with charakters and alter their values for a longer period of time. Charakters can get temp effex by being attacked with an action causing a temp-effect or by (non-removable) map-effects. Use the large frame on the right of the tab to create and modify Temporary effects.
The several controls should be easy to understand: name and description identify and explain the effect. Duration determines, after how many turns of the victim the effect wears out. Roundly HP-change / SP-change: The victim wins (or looses, when a negative value) this amount of hp / sp.
basic-armor change -- SP-regeneration change: These attributes of the victim are changed by the specified amount for the duration of the effect.
assimilating: The target of this tempEffect changes team for the duration of the effect ande fights with the caster against his own teammates (mighty!).
If you want an action to affect a target with a temporary effect, select the temp-effect in the right listbox (make sure every change made before was set permanently through one of the BlueButtons) and press the "c- set"-button. Make sure, that the "affects with temporary Effect"-checkbox is activated and chose the damage-type of the effect. Resistencies of targets alter also the effect of temporary effects!
MapEvents / HeroAbilities
Sorry, as long as more crucial topics are not dealt with, I won't write a detailed explanation of these topics.
MapEvents
MapEvents are happenings linked to a tile of a map. There are three kinds:- showArea: Similar to the later "stepOn". As soon as a charakter steps on the tile, a far area around will get visible for the team. You can define, if the effect sees through obstacles and if this area stays visible.
- StepOn: The effect starts as soon as a charakter steps on the tile. The effect can happen just once or as long as a charakter stands on the tile. In the later case, the effect is executed every "(average) pause-ticks". "Occurs randomly" varies the pause ticks.
- period-activated: The mapEffect will begin at "start-time" and run till "end-time". No one needs to step on it!
... and BlueButton.
HeroAbilities
HeroAbilities are quite similar to MapEvents: Three radio-buttons define what should happen: Make a wide area visible, unleash an action or summon charakters. One thing is new, though: Summoned charakters don't live forever, but die after some time. Define that time with the "vision- / summoning-duration"-control. I hope, everything else is self-explanatory.
Map
Now, we are getting somewhere. Create maps!
Peripheral stuff
There are some basics besides the name you should decide before actually painting the map (now, the caption "peripheral stuff" seems stupid - this is central! :/ ). Firstly, you should decide, how big your map is going to be by setting the "# Tiles horizontal/vertical"-controls. There is no rule for good sizes here, but since your players don't have forever don't make them too big.
Then, another important decision: Do you want to use "FogOfWar"? If turned off, everyone can see everything! Usually, switching the FoW on causes the difficulty of the map a little.
Then: Do you want a map-tempEffect (TempEffects were explained above in the "actions"-chapter)? map-TempEffecs are not removable and can change the gaming-experience a lot!
Now, you should decide, how many optional charakters are allowed in the map. For the team that is intended to be played in a campaign this number should at least be 1 to make sure, that the hero is allowed on the field, too. The hero is always the first optional charakter!
Briefing and Debriefing, which are settable by using the up-popping RichText-Creator, can usually wait till later, when you assemble a campaign.
Rules
In this frame, you can alter the rules regarding "critical hits" for this map. This is advanced stuff, and can be safely ignored. But if you want to add some extra spice to the map, here you go:
- backstab-factor: Determines the likelihood-increase of a critical hit when attacking someone from behind. When 5, an attack from behind will be a critical hit with a likelihood 5 times the usual.
- sideattack-factor: Similar to the backstab-factor, but for attcks from the side.
- critical hit: armor factor: A factor multiplied onto the basic armor of the victim when hit by a critical hit. 0 means: Critical hits are not diminished by armor
- critical hit: damage factor: A factor multiplied on the original damage when hit by a critical hit. 1: nothing happens. 2: original damage is doubled and so on.
The MapCreator: General
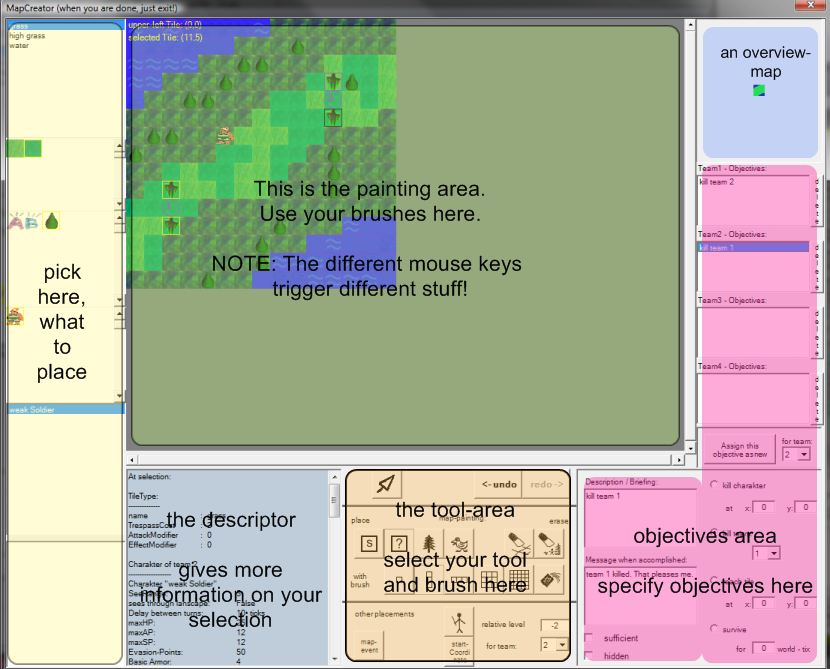
The MapCreator consists mainly of six areas (see also picture above):
- the painting area: In here, you "paint" the map. Not "wysiwyg", but close.
- the picking-area: Pick, "what's on your brush" in these controls: from top: TileType and bound graphics, graphic objects, deco-livings, charakters, mapEvents.
- the tool-area: Here, you specify, what your brush should do (e.g. place graphic objects) and it is shaped.
- the descriptor: Delivers additional information to selections.
- the overview-map: Well, it's an overview map. What's there to explain?
- the objectives-area: Create objectives in here and assign them to the teams
The MapCreator: Painting the world
... to be filled soon ...
The MapCreator: Populate it
... to be filled soon ...
The MapCreator: Assign objectives
... to be filled soon ...
Give rewards
... to be filled soon ...
Test it!
... to be filled soon ...